如何开发设备驱动应用 mapper
本文介绍设备驱动应用 mapper 的开发和部署流程。
-
进入到 KubeEdge 仓库的 kubeedge/staging/src/github.com/kubeedge/mapper-framework 目录下执行
make generate命令:make generate Please input the mapper name (like 'Bluetooth', 'BLE'): foo # 这里的协议是后续需要再创建 deviceModel 的时候填写的-
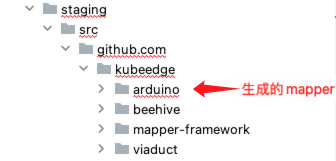
执行完成后,会在 mapper-framework 的同级目录生成与协议名同名的 mapper 代码目录。

-
可以将该目录复制出来进行 mapper 开发,主要需要关注的地方是 driver 目录下的代码:
该文件对应 mapper 对设备的操作实现,主要实现 InitDevice(初始化设备), GetDeviceData(获取设备数据), SetDeviceData(给设备赋值), StopDevice(停止设备)
package driver import ( "github.com/tarm/serial" "log" "os" "os/signal" "sync" "syscall" ) func NewClient(protocol ProtocolConfig) (*CustomizedClient, error) { client := &CustomizedClient{ ProtocolConfig: protocol, deviceMutex: sync.Mutex{}, // TODO initialize the variables you added } return client, nil } func (c *CustomizedClient) InitDevice() error { // TODO: add init operation // you can use c.ProtocolConfig return nil } func (c *CustomizedClient) GetDeviceData(visitor *VisitorConfig) (interface{}, error) { // TODO: add the code to get device's data // you can use c.ProtocolConfig and visitor // 打开串口设备 // 打开串口设备 return "ok", nil } func (c *CustomizedClient) SetDeviceData(data interface{}, visitor *VisitorConfig) error { // TODO: set device's data // you can use c.ProtocolConfig and visitor // 打开串口设备 config := &serial.Config{ Name: "/dev/ttyACM0", // 替换为您的串口名称,例如 "/dev/ttyUSB0"(Linux)或 "COM1"(Windows) Baud: 9600, } port, err := serial.OpenPort(config) if err != nil { log.Fatal(err) } defer port.Close() // 监听操作系统的中断信号,以便在程序终止前关闭串口连接 signalCh := make(chan os.Signal, 1) signal.Notify(signalCh, os.Interrupt, syscall.SIGTERM) go func() { <-signalCh port.Close() os.Exit(0) }() _, err = port.Write([]byte(data.(string))) if err != nil { log.Fatal(err) } return nil } func (c *CustomizedClient) StopDevice() error { // TODO: stop device // you can use c.ProtocolConfig return nil } -
调试需要修改 config.yaml 中的 protocol 字段,填前面定义的协议名称
-
-
部署 mapper 应用
二进制部署
-
在项目的主目录使用 go build ./cmd/main.go 编译出对应架构的二进制文件,比如编译 linux 环境下的可执行文件
- -o 参数可以不填
-
将二进制文件上传到设备绑定的节点,注意需要在可执行文件所在目录将 config.yaml 文件放在这里,否则会报文件找不到的错误
容器化部署
-
使用提供的 Dockerfile 文件进行编译
-
编译完成后,使用 resource 目录下的 configmap 和 deployment 资源进行部署
Note
修改 deployment 的镜像为实际编译出的镜像名称,configmap 也需要修改 protocol 字段。
apiVersion: v1
kind: ConfigMap
metadata:
  name: cm-mapper
data:
  configData: |
    grpc_server:
      socket_path: /etc/kubeedge/arduino.sock
    common:
      name: arduino-mapper
      version: v1.13.0
      api_version: v1.0.0
      protocol: arduino # TODO add your protocol name
      address: 127.0.0.1
      edgecore_sock: /etc/kubeedge/dmi.sock
-
以上,完成设备驱动应用 mapper 的开发。